Simple checks
Trimix Analyser Connector troubleshooting
Start with the analyser setting and the soldered wires, then check Wi-Fi and the printer.
Connect only the ESP32-S3 board to USB. Reconnect the analyser after flashing has finished.
No O2 or He values
Analyser data and wiring
| Symptom | Checks |
|---|---|
| Adapter powers up but has no readings | Enable Menu → Preferences → Send Data to USB → On (or Data output) on the Divesoft analyser. Confirm the analyser itself shows valid values. |
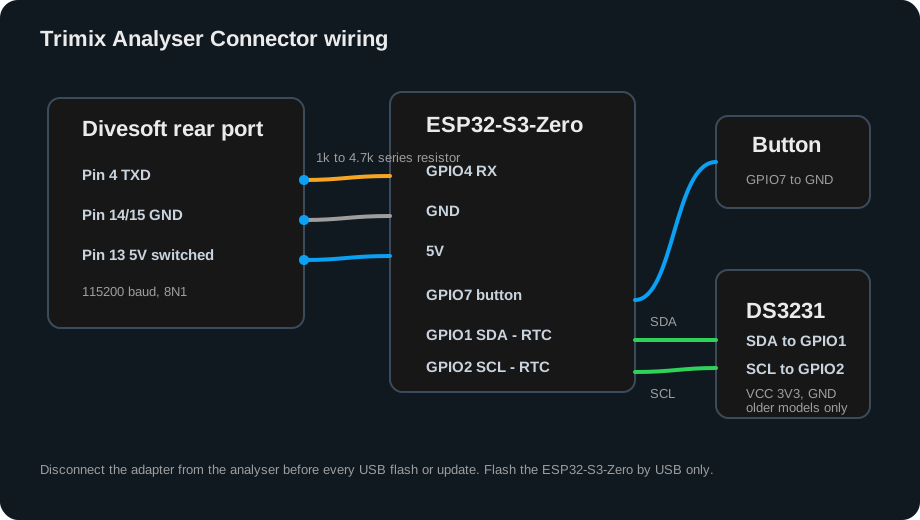
| Still no readings | Unplug everything and compare the soldering with the diagram: Divesoft pin 4 to ESP32 GPIO4, and Divesoft pin 14 or 15 to ESP32 GND. Check for a loose wire or solder bridge. |
| Readings stop or become invalid | Return the Divesoft analyser to its measurement screen, check that it still shows valid values, and make sure the connector or cable is not loose. |
| Older analyser has no date | Connect the adapter to Wi-Fi once to set its clock, or fit the optional DS3231 clock module as shown in the build guide. |
Local setup
Wi-Fi and Web UI
Cannot see TrimixAdapter-XXXX
- Confirm the board is powered.
- The setup Wi-Fi turns off after a period of inactivity.
- Restart the adapter to make the setup Wi-Fi appear again.
- Stay close to the adapter while connecting.
192.168.4.1 will not open
- Join
TrimixAdapter-XXXXand accept the no-internet warning. - Use
http://192.168.4.1/, not HTTPS. - Temporarily disable VPN, private relay, and automatic mobile-data switching.
- Forget/rejoin with the factory password
12345678if it has not been changed. - Stay close until the first page loads.
Bluetooth labels
Printer and pause-to-print
| Symptom | Checks |
|---|---|
| No printer discovered | Charge and switch on the Niimbot B1/B21, close the cover, end phone-app connections, move it close, and scan again from the Print tab. |
| Pause does not print | Confirm at least five seconds of valid readings, the configured pause delay, a saved powered printer, and that repeat protection has expired. |
| Unexpected repeat behaviour | Let the analyser readings resume after printing and wait for the repeat-protection time before trying again. |
| Optional button does not print | Check GPIO7-to-button-to-GND wiring and release the button after a valid current reading. The button is not blocked by automatic repeat protection. |
| Partial or wrong label | Discard it. Check stock, cover, charge, range, owner, time, pO2 limits, water type, END model, and live Divesoft values before retrying. |
At-a-glance state
LED colours
- Purple
- Setup Wi-Fi active; flashes during startup.
- Green
- Saved Wi-Fi connected; brief flash after successful print.
- Blue
- Flashing while connecting to printer; solid while sending label data.
- Yellow
- Pause-to-print countdown; flashing can indicate stopped analyser data.
- Red
- Error; flashing indicates a recoverable connection or print error.
- Dim white
- Powered, with neither saved Wi-Fi nor setup AP currently active.
If the physical colours are swapped, change the LED colour-order setting until the displayed guide matches the device.
Licence and updates
System checks
Trimix Pro activation
- Copy the exact 12-character Device ID from Licence.
- Email it to hello@trimixanalyser.com.
- Paste the supplied device-bound code into Activate existing key.
- Basic Nitrox labels work without a Pro code.
Firmware install or update
- Unplug all analyser wiring before USB.
- Use update-only for routine updates that must preserve settings and licence.
- Use full install for a new board, recovery, or when support asks you to use it.
- Power-cycle USB if setup Wi-Fi does not appear after the flasher reset.
Need help?
Send the useful basics
- Adapter firmware version and Device ID.
- Divesoft analyser model and whether data output is enabled.
- Printer model and what happened.
- Clear photos of the wiring and any message shown. Never send Wi-Fi passwords or licence keys.